Sunday, August 29, 2010

Cool home made bling....

Still working on the bits and pieces to put the mast together.


Saddle to hold the shrouds to the chain plate and the forestay fitting:


These pieces have turned out really sweet.


I am really not set up for metal fabrication.....this is a pretty down home effort. For instance, I cut out 4"x4" squares for the saddles. I then clamped them to the workbench with 1/2 the saddle protruding off the edge of the bench (on a 45 degree angle so I could fold corner to corner) and grabbed the corner that was hanging off w/ some vise grips and began to fold it over. This is 1/8" stainless steel and is really stout material. Fortunately I have a shelf on the bottom of my worbench full of tools or I would have simply lifted the bench off the floor. So I begin to wrestle with the piece and slowly get it to fold to about 90 degrees and then ever so slowly to about 135 degrees.....not quite a taco, but getting close. The problem is the radius of the curve is too large. I need to get a tighter fold. So I stand back, scratch my head and think, "what is the maximum preasure I can bring to bear on this with what I have on hand....". Then it dawns on me, use gravity, and something heavy.....REALLY heavy. The heaviest thing I own is my car. And it is no light weight import. It is a Lincoln Towncar. (And yes, I have heard ALL the jokes about chauffering to the airport and how many bodies fit in the trunk....). So I put the saddle just behind the front tire, with a piece of wood above to spread the load from the tire and below to keep from marring it and SLOWLY back up. I get the car fully on top of the saddle and.........NOTHING!! My little vise grips and wood clamps had folded that metal as far as it was going to go. Fortunately, my neighbor showed up just about that time and I KNOW he has a beefy bench vise. 15 minutes later I have 2 saddles w/ just the right bend!!!
The mast is NOT going to fail because of chain plates or the connection to the shrouds!

Saturday, August 28, 2010

Someone put FOAM in my mast....and I'ld like to BEAT THEM SENSLESS!!!!


Had planned on running internal halyards, but didn't expect to find large chunks of closed cell foam all the way up and down the inside of the mast. They simply would not have provided a great deal of flotation, and they weren't fit tight enough to keep water out.....they were just some idiots bright idea....probably some hack home builder......


So I spent the ENTIRE day creating ways to extract the crap.

Thought one: pour in solvent to melt it.....but every thing I tried (including walking around the hardware store openning every type of nasty chemical I could lay my hands on and dripping some over a sample) proved that this is PETRIFIED foam.


Thought two: stand the mast up with something in the top end and bounce the mast to push the foam out. I started with smaller items and eventually had a section of lead pipe, probably 20 pounds worth of concentrated battering ram....and got nowhere.


Thought three: use long sections of 2x2 to insert and pound it out....again, no luck.


Thought 1.5 (forgot this one already)....shop vac on one end and compressor on the other.....you can guess how that worked.


Finally I created a 15' long drill bit using conduit, expansion bolts, cotter pins and an agressive wire brush on the end, and slowly drilled the foam out.


Here is the contraption:


And the mess:


BUT VICTORY WAS MINE!!!!! I can now run my halyards THROUGH the mast.


I also received my latest package(s) of goodies. Really cool web tie sheaves for the forestay adjustment, the GREEN and black fiberglass sleeve material for the prod and my $50 headstay bolt....long story on why one bolt cost so much....but let's just say it is EXACTLY what I needed, and they are hard to find.


Still putting together metal bits and pieces, but hopefully I am close to assembling the mast.

Saturday, August 21, 2010

what I can and can't do......


Here is the mast base and halyard organizer (what I can do)......


And the standing rigging I ordered (swaged, which I can't do......)


Just about all the parts for the mast are done.....may assemble tomorrow! This won't be the lightest mast in the fleet....but should come in under 40 pounds all up. Hopefully that doesn't wreck the "righting moment" equation (in other words, I hope the mast isn't so heavy it tips the boat over by itself!). But I will feel confident sailing it around SF Bay, which is worth ALOT in and of itself!

Thursday, August 19, 2010

whole new repetoire....

I am trying my hand at metal work now......dealing with .040" material instead of .25" material.


Metal work is dirtier, louder, and not nearly as aesthetically pleasing to me......but highly functional and certainly neccessary.


Some tools and the beginning of my chain plates and tangs for the mast:


My plan is to also make the mast base halyard organizer and the stem fitting. Also ordered my standing rigging today...may have a mast this weekend????????

Sunday, August 15, 2010

Christmas in August!!


The PRIMARY activity this weekend was cleaning out the garage. Fairing and sanding generated a fine patina of dust on EVERYTHING in the garage, that generally found its way into the house despite my best efforts. Molly has been very supportive of the build, but the last 2 months of sanding have...well, let's say, "tested her patience". So while she was out Saturday with some friends (on a pub crawl no less!) the boys and I took everything out of the garage, then blew it off or washed it, and put it back in the garage. It was an 8 hour marathon, and they were troopers! I am still beat tonight, but it was worth it. You know the saying, "if momma ain't happy....nobody's happy"! Well, momma is happy again!


I also got the sails I purchased in the mail this weekend. They are Quantum second hand sails from a Melges 20 owned by Michael Kiss. The head will need to be cut down a bit on the main and the jib, minor surgery. The spinnaker should plug right in. This will leave the boom a bit long for class sailing, but I am not seeing another i550 in my neighborhood anytime soon.


More presents showed up in the form of the Ronstan hardware kit I ordered from Watershed. Very exciting to have the "boat bling" in my hand to start placing pieces!!!!

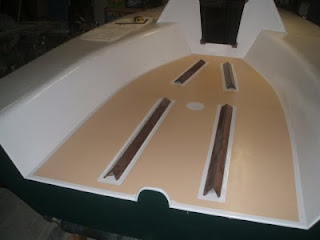
Finally, I got a coat of non-skid on the cockpit floor. The boat is going to look real nice when finished!!

Tuesday, August 10, 2010

bits n pieces....

Spreaders


and mast step


Sunday, August 8, 2010

BBBAAAAMMMMMM!!


Pulled the tape today and the paint looks AWESOME!

A couple of shots....


(Should have wiped down the sides for the glamour shot...oh well....)


And my favorite...if you look closely, you see the reflection of the foot bensons on the far side of the boat...NICE!!!


Also got the spreaders set up. They will require some glass cloth, but are looking good so far. Just hope a squirrel doesn't decide to try climbing this mess before the epoxy cures!!!


It's getting closer!! I can alsmost TASTE it!!!!