Wednesday, April 28, 2010

Companionway and Cockpit


First, after going around in my head about how to approach the cockpit, and then a fruitful e-mail exchange w/ Jerome Negre, I have decided that this is the way I am going to proceed with the cockpit: 1) cover all frames and the outboard rail w/ plastic 2) temporarily screw ddeck pieces in place 3) zip tie foam 4) fit sides 5) tab those from below 6) fit cockpit sole 7) shape foam 8) glass all from above 9) pull out monocoque cockpit/flip/tape seams 10) replace it and tape what I can reach. There will only be a few spots that will be unaccessible, and this will create a bomber cockpit.


The option was to work from the outboard in, shaping/placing/taping each piece in as I went. I can't see how I am going to get the sole in the way I want it if I go that route.


But I am not too far into this process to change my mind again so ANY ADVICE will be welcomed!


I should have all that knocked out in a night or two.....


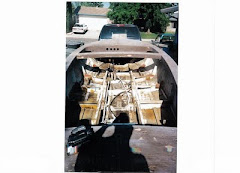
Second, I cut out the companionway. I am happy with what I ended up with...so far.


I went 20 inches wide and 18 inches back from the trailing edge of the rooftop. I then cut down to 4 inches above the cockpit sole, and tapered it in to about 15 inches wide.

I have found that a sawsall is surprisingly handy at times.....in this case, cutting the corners from the cabin top to the aft face of the cabin.

Finally, I quickly ran through the blogs of Pipedream, Alchemy, and Clownfish and found that if you timeline their builds, working out the cockpit marked their half way point (approximately). If that is the case, I need some of those 220 V tools they use in Australia to accelerate my build or I am going to miss the season altogether!!

Friday, April 23, 2010

When all you have is a hammer......

Everything looks like a nail......


When all you have is CABLE TIES>>>>use them on EVERYTHING!!


Was trying to figure out how to get the foam to stay put, tape wasn't working, nails seemed like overkill, no quick set glue on hand, but LOTS of zip ties.....


Here's what the cockpit of the winnebago (thanks Tim R...long cabin short cockpit is now a family van!) is looking like tonight:


I also made a road trip this morning early to grab 2 more sheets of ply. I was trying to cobble together the pieces for the cockpit from left overs and thought it was a bit half-assed. I will have used a total of 22 sheets. Most of the extra was in tripling frame 89, a re-cut of the cabin top, and inefficient "nesting" of my larger panels. Not bad actually!
Thanks also to Gordon who dropped off 2 boxes of miscellaneous hardware etc......VERY GENEROUS!

Wednesday, April 21, 2010

Cockpit started....

Chad McNeely of Knot Racing (www.i550knotracing.blogspot.com) drove up from SoCal for the boat show and was kind enough to swing out to Sacrameno for a viewing. It is awesome to get to meet a fellow kool-aid drinker in person! His boat, and skills are impressive! It's scary how much time I could spend just talking about the what-ifs of the build process.....which brings me to my recent progress:

I am starting to loathe statements like, "Due to it's simplicity of construction......" and instructions like, "next, install the cockpit..."


Oh sure, no problem, I'll just whip that right up!!


(I say that tongue in cheek...sort of.......)


Where do you need longitudinal stringers? Where should one place extra cleats to support edges/corners? Given limited access to the rear of the boat, how do you get in and glass down the last panel to be installed?? Inquiring minds want to know......and inquiring minds mean idle hands, which means little physical progress, which means I'll be sailing next summer if I'm lucky!!!


Here is a picture of what I have begun:
I am using foam that I'll sand down to this radius:


I think if I put the side decks on, the radius foam and the side panels, I can tape the underneath of all that by reaching in from the center.


Then I will slide the aft half of the cockpit sole in and be able to reach the forward part of that. The aft will rest on cleats and be epoxied to those and taped from above. That only leaves the forward cockit sole, which I do have access to from inside the boat.

No doubt it will all come out as well as the rest has.......just keep cuttin and prayin!!

Saturday, April 17, 2010

Cabin top nearing completion.....


Lots of tape for the interior of the cabin top:


And the cabin top w/ thickened epoxy in joints ready for fairing, round 1:
I still need to tape all the thwartship joints at the frames etc, but it is already really solid.
Last night I climbed in the cockpit and looked out over the bow of the boat, made little boat noises and imagined sailing along on my mini yacht for the first time......very inspiring!
I don't think anyone saw me!

Tuesday, April 13, 2010

Cabin top and forward decks

Found the USB cable so here are the recent pictures:

Overall shot of (nearly) final cabin top and side decks:

Starboard rail looking fair:

Port rail getting there:

Next is cutting the zip ties (cabin top tabbing completed tonight) and taping the interior seams of the cabin top. Then I will begin to sort out the cockpit.

Monday, April 12, 2010

progress continues...

We "misplaced" the USB cable to upload pics so I haven't posted anything in a few weeks. I am still making progress though. The cabin top is stitched together and in place and mostly tabbed. The deck from the bow to the front of the cabin is epoxied in. The deck from the front to the rear of the cabin top got epoxied in tonight. In the next night or two I will tape the inside of the cabin top. I will post pics as soon as I am able........