Thursday, January 21, 2010

Stringers and bow timber

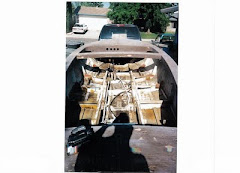
I started fitting the longitudinal stringers in the back of the boat tonight. As I mentioned before (see posts below) there are as many variations of this as there are builders working on these boats. I went towards the minimalist end of the spectrum. 2" stringers made of 1/4" ply that will be filletted and taped w/ 2" tape on both sides. Minimal weight, minimal fuss, and lots of faith that the design is sufficient as drawn. There has been a great deal of discussion about how to hold these buggers in place until they are glassed in. Quick set epoxy seems to be popular. I went a little more "old school" and used some wooden wedgies to "jam" them in until the epoxy cures........I'll let you know how THAT works tomorrow. I was ready to start mixing epoxy until I realized I was out of disposable gloves!! (West Marine, here I come!!)

Here's what the stringer placement looks like:


Since I had a bit more time on my hands, I cleaned up the bow timber. I had started w/ a piece of 4/4" oak, but saw that a little extra up in front wouldn't hurt, so I doubled it w/ a second piece.


I am really just killing time here until I can finish shaping the keel strut (a job that requires the use of an electric planer which is noisy, therefore requiring daylight hour operation and no rain!!!) Hopefully this weekend I take some big steps in that direction.

Helpers

I had some help in the garage tonight. Mickey and JP, my boys, decided to come and give me a hand! (Given that the choice was help me or empty the dishwasher, I would say I am pleased with their decision!)


Mickey helped a geat deal w/ measuring the longitudinal stringers I set in palce tonight (see previous post) but first wanted to do some "photo documentaition". Here are his pics:

A self portrait:

His brother:


Daddy's booty:


Action shot:


And finally, a shot I took of the first person to climb INTO the boat:


THAT was fun!!


Tuesday, January 19, 2010

Bulkheads DONE!

This was no minor feat. I have now placed, wire tied, patch epoxied, pulled ties, filleted and taped all the bulkheads. The boat is stiffenning up nicely. Here are some shots of the finished product:


I am happy with the way it came out.

I am now in "head scratching" mode as I begin to lay out what the internal stiffners/longitudinal stringers will look like. Up to this point I have relied soley on the plans and build instructions. With this next step, there is a great deal of room for personal interpretation. The big trade off is stiffness vs. weight. I also get into a "horse before the buggy" scenario: I need to finish the keel in order to make the keel sleeve, in order to make the keel box, in order to get frame 110 in. Then the bunk supports go in and the longitudinal stringers go in. So as tempting as it is to start doing the stringers, I really need to finish fairing the keel.

Tuesday, January 12, 2010

i550 website collapses around us!

I suggested using the chat tool on the i550 website (www.i550.org) 2 weeks ago at a prearranged time. The chat tool is nice only if someone is there to chat with. Last week had a few folks attend and the idea gained some momentum. This week enough folks showed up that we crashed the server!
You gotta love a group so enthusiastic that they break their own site!
I hope we build boats better than we build websites!!
Still filletting and tabbing bulkheads so not much to show pictorially.....will get a shot when finished. Hopefully that is later this week.
Thanks to John P for helping last night, we got a TON done!!

Saturday, January 9, 2010

Me and John Henry or Shaping the Foils

John Henry, legend has it, raced a steam powered drill in a contest to see if man or machine could drill a tunnel faster. John Henry won, only to die with his sledge hammer in his hand after he broke through the far side of the tunnel ahead of the steam drill.

After today, I believe the days of hand crafting a foil are numbered. A CNC router has GOT to be faster and more accurate. It's 8:30 pm and I am going to go pass out in bed w/ my hand planer stuck in my clenched fist!

This was one of the coolest parts of this project. Here's the story:


Laminate a blank big enough:


Glue the paper templates on to thin ply:


Shape the template to size:


Admire your templates:


Tack the templates on the end of your stock:


Use a skill saw or router to cut channels to the appropriate depths:


Use a hand plane or electric planer to take off excess:

Stand back and admire your finished foils:


Actually, before I go pass out, I need to back out the garage and admire my rudder one more time.....it's just too cool! Too bad John Henry never got to admire his tunnel.
Tomorow I do the keel.


Monday, January 4, 2010

100 HOURS!!!


It's been awhile since I posted. The holidays slowed me down some, but I am also trying to stay ahead of a flu bug that keeps threatening to stop me altogether. I take it easy for a day or two, then feel better, get back out in the shop at night, and feel like crud the next day.......rinse, repeat........but I have hit 100 hours build time so far.


I have all the bulkheads in place as of tonight. It all looks pretty good. The bow flares out near the front of the boat more than the plans call for (by 1/2" or so per side) which worries me less than the option....pushing in too hard creating hollows at a minimum and cracking ply at worst. Here is the picture:


I also want to thank Gordon for coming by and helping out. Here he is enjoying fresh baked chocolate chip cookies. (Those would be compliments of my wife.)


I'm feeling pretty healthy so I'm optimistic that I'll get the bulkheads tabbed, filleted and glassed in the next week or so.