Sunday, March 21, 2010

Bunks glassed in


The bunks are down and glassed.


And a picture of my other (time consuming) pastime......15 uniforms for JP's T-Ball team the Blue Jays and Mickeys Marlins jersey and hat....it MUST be spring!!


Wednesday, March 17, 2010

Happy St Patrick's Day!!


One picture, progress on three fronts:


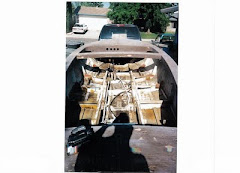
Cabin top: final rough in version complete. I can now use this to scribe the exact cut out for the deck. And put up out of the way until I get there.

Supports for deck between 18 and 53.5: This is a LARGE area w/out support so felt a few stringers would be a good idea.

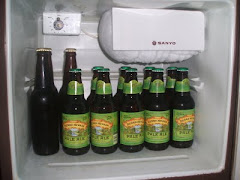
Guinness Stout: It'd be Sacrilege not to have a Guinness on St Paddy's Day!!

Tuesday, March 16, 2010

Cabin top

Started the cabin top. Thought about trying a one piece top but that requires a compound curve which we all know isn't so plywood friendly. I need to recut one side as it isn't quite right. I left the top two pieces oversized on the outboard edge so I can scribe the actual dimensions onto them and cut rather than trusting that I was exactly to plan.


I also added a piece up front that should make bringing the four pieces together a great deal easier without changing anything important.

The photos show the first rough draft......I'll take more pictures as it gets dialed in.

Thanks again to John who has shown up consistently to help out....stuff just gets done faster with an extra brain and 2 hands!!

Wednesday, March 10, 2010

Frame 89

I couldn't see moving ahead with the compression post without beefing up frame 89 first. I tripled the top half across the cabin top and down to just below the lightening hole (triangle cut out).......possibly overkill, but would hate to have to rework it later.
I had also tripled the bottom. In hindsight, I should have just doubled the whole thing.
I would make a comment about how the next boat will be so much better, but I would hate to make Molly cry........

Tuesday, March 9, 2010

Chain plate gussets looking SEXY!

A shot of the chain plate gussets w/ carbon/kevlar fixin's....just what the doctor ordered:

Sunday, March 7, 2010

Lots of progress.....

My good friend John Perault spent a huge chunk of time helping me this weekend. He quickly diagnosed the PRIMARY problem that I have run into recently...and it didn't haveto do with the boat. I was stuck in "FIDDLEFUCK" mode! It is so easy to get far too involved in over thinking this thing. John would have none of it. We got a ton done.


First, a picture of the shop in full on disaster mode!


All of the bunk supports are sorted, epoxied and ready for bunks, which are cut and ready to go in.


I started the process of epoxying the interior. Amazing how it all cleans up with an even coat epoxy. I am going to finish the interior in neat epoxy for the time being. I like the look, and although paint hides alot of flaws, I want people to see what I have done, warts and all.


And we got the chain plate gussets set up. I hope to glass these in tonight.


This is the pace I was working at until I started fiddling with the keel foil. That really stalled me. There is almost nothing that you can do so wrong that it can't be ground out and fixed if you do it badly. The point is, and I say this for my own sake as well as those reading and thinking of building, is JUST GET TO IT!! I want to be sailing this spring...not fairing and futzing!

Thanks so much to John.....MUCH APPRECIATED!!

Advil and beer...........ahhhhhhhhh.

Monday, March 1, 2010

Prayers answered.....

The keel pulled out of the sleeve w/ minimal resistance....YEAH! SO that part just needs to be cleaned up, some fillets added for cosmetics as much as anything, and I am about done with it. I am also thinking of adding some thwart support to the top of the box (hardwood 1"x1" at the front and back of the keel box joining that to the bunks) once the bunks are in just for good measure.


Tonight I set up the base of the compression post. Again, left over material from a kitchen remodel came in handy. I had helped a friend install some maple butcher block counter tops. The off cuts are the right size to help carry the loads at the base of f89, which I tripled up. I haven't bonded everything in yet so any advice/observations can still be used!