Thursday, December 31, 2009

Better than sistering.....brothering?


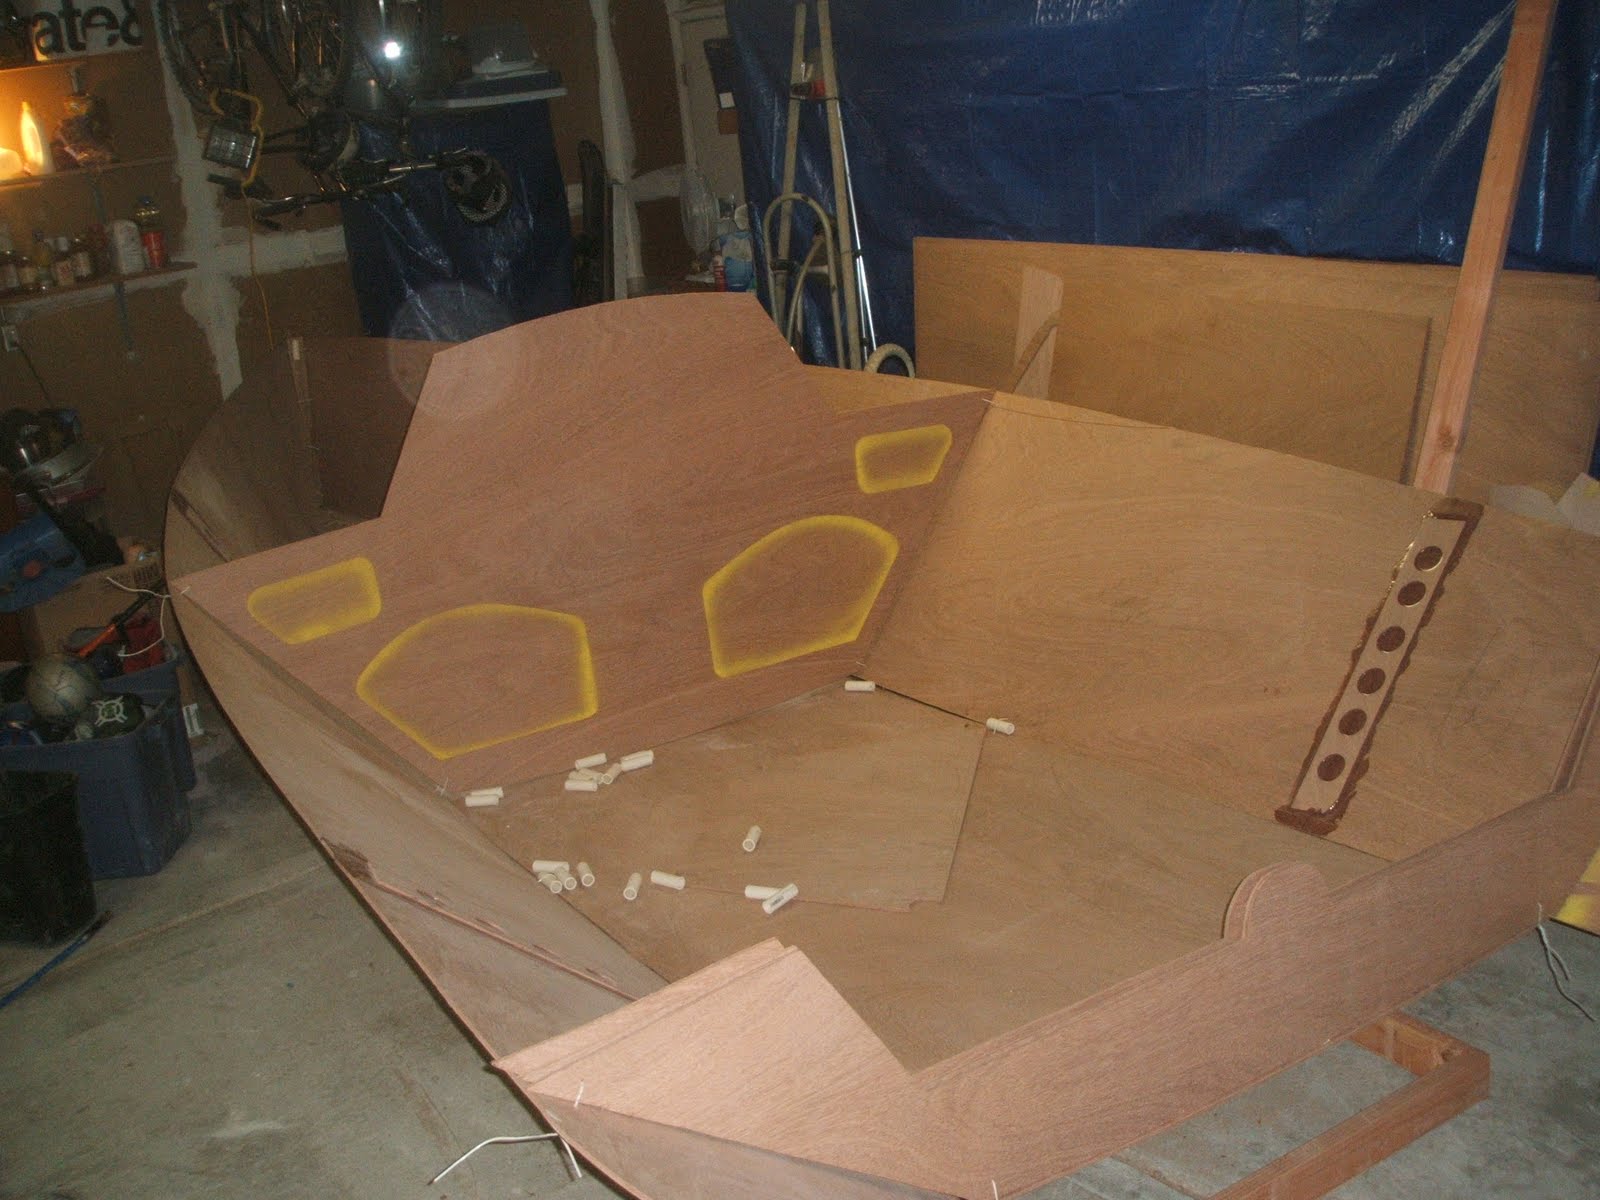
So there has been an issue w/ some other builds (and now mine) that the sides of the boat only meet the bulkeads (cross members) if you pull them in tight. The problem is, if you pull them in tight, you create hollow spots in the outside of the boat where the sides are pulled in. The solution seems to be, pull the sides in as far as possible without creating a hollow, and then sister in a piece of wood to the bulkhead to make it reach.


In a moment of genius, I bettered this idea. First, I layed glass tabbing on either side of the bulkhead:


The I filled the gap w/ thickened epoxy to create a perfect "sister"....or a brother.....(I'm making alot of this up as I go, so I think I can name it too.) The redish color in the fiberglass is the thickened epoxy. Masking tape is not great for closing off the bottom of the channels, but sufficient.


We'll see if it holds up in a few months. I will back these up with a full fillet and full length tabs as well. So probably minimal weight savings if any.

Saturday, December 26, 2009

Family day!

Uncle KJ, (my wife's brother) and Uncle Kieran and Uncle Mickey (my wife's ACTUAL uncles) all swung by to help today. Their timing was good as I wanted to fillet and tape the chines.


First picture is a group shot L to R: Me, KJ, Mickey and Kieran).


Second is a picture of the starboard chine wetted out w/ epoxy.


Third is the fillet going down (too runny, live and learn).


Fourth is KJ and I laying tape.


Fifth is a shot of our craniums.....you know, the most important tool.......


Sixth is the finished product. I am stoked.

Friday, December 25, 2009

Merry Christmas!


Pulled the clamps off the sheer clamp and pulled all the wire ties off the center seam and sheer line. Also cleaned up the intereior in preparation for taping the seams. It is looking good!!

Hope Santa was good to you!


Wednesday, December 23, 2009

Friday night SMACKDOWN.....on Wednesday


Tonight I epoxied in the bow timber. Others have blogged about how that piece of wood tends to slip as you clamp it into place. (The bow, looking down at it from above, comes together at a point. As you clamp the sides together, the tendancy is for the bow piece to squirrel back into the boat). Well, it does! After tapping then beating it forward to where it belongs, I finally drove 2 screws into the front of the bow piece so I coul pull it forward. This worked well. I was also using plastic wire ties which I found would break under a smaller load than the copper wire I had been using. Copper wire (12 gauge) is good....plastic wire ties, mediocre. But after a sound beating, the whole piece succumbed, and I am pleased with the outcome. I will put a layer of glass on the inside, and the outside will eventually be wrapped as well.


epoxy set up


Here's a pic of the epoxy and pumps (and associated "downfall" or waste from 2 night s of work).

I'm going to burn through ALOT of epoxy at this pace......it is really critical to balance 1) how much epoxy is needed 2) a factor for a little excess for each job plus what will be left clinging to the sides of the container you are usingand brushes etc 3) excess left in the boat (as weight of the overall fnished product is critical). Also pictured is the small space heater and fan. Temperature control is also critical. I have been lucky that it has been consitently 50 degrees or there abouts in the garage at night.

Tuesday, December 22, 2009

S-T-R-E-T-C-H.....


Tabbing the entire bottom panel in one go was a big stretch, but I got 'er done before the epoxy got too thick. I mixed a 10 shot batch (the epoxy and hardner is a 2 part system and must be mixed correctly. The pumps that come with the "system" allow you to pump once from each container to get the right mix, or multiples thereof........so I pumped 10 times each. The problem is 2 things happen when you mix bigger batches. One, because the epoxy "exotherms" or gets hot and begins to kick, a large volume will begin to feed off it's own heat and start actually smoking and bubbling. Second, the more you mix, the longer it takes to work all that epoxy.) I split the batch into three small containers first to slow the self anhilation process. Second, I cranked up some rock and roll and GOT BUSY! The last few tabs were a bit hard to work, but it all looks alright. Here are the results:


Monday, December 21, 2009

EPOXY ARRIVES!!!!

Santa Claus showed up in a FedEx truck today.

So I went to town tabbing in the center seam and a bit around the edges. Tomorrow will be a marathon of glue.

Tonights progress:


Progress in the absence of EPOXY....

I was STILL waiting for epoxy to arrive this last weekend so had to find something to do. I read more than once that not having a shaped keel holds up progress so figured that would be a good start. I used Alaskan Yellow Cedar that George Magan Stairbuilder had left over. The stuff has a very different smell when you cut it, but I like what I had to work with. I LOVE milling lumber.


So out of some 12" x 4" x 20' (yep, you read that right BIG) pieces I got this:


And as I cleaned them up I got this:


Sunday, December 6, 2009

this was easy.....


Here is a picture of the little sliding table I created in 5 minutes to cut the 8:1 scarf joint for the sheer clamp material. It's the little things that count!
Once I cut the scarf, I glued together 2 14' pieces of 2x2. That was the picture I should have taken!
The final piece was so long I couldn't get it in the garage to use the shopsmith...so we ended up on the front lawn.....thank God for 8 year old shop hands to tail a beast like that!!

this weekend in boat construction 101.....


Mostly got the transom tuned up, attached, and cut the sheer clamp.

Still dragging my feet as I need epoxy to start to tab the bottom to the sides, but really dragging my feet as I am not confident about the bow. Basically the advice has been start placing frames, and they will get the bow going in the right direction.

This is a great example of my personal on going "cavalier vs conscientious" debate. A smart and experienced builder knows what errors can be filled w/ epoxy and sanded over (cavalier), and which will affect the outcome of the lines of the boat (conscientious).

One can spend months scratching their head, worrying about the fact that the bow veers an inch plus to the right, when it really hardly matters and will correct itself over as the build progresses. One can also ignore such things and push on, figuring they will work out, only to find out that they have spent a great deal of time, money, and effort building a shoddy product.

For the moment I will err on the "prudence is the greater part of valor....." side of the equation.


EPOXY IS ETERNAL.......

trouble in paradise.....

So the whole bow section is shifted off to starboard (right). The hard part is that the piece of wood that is at the very bow of the boat is plumb (straight up and down) and a level placed across the boat is, well, level....so it becomes hard to tell what the culprit is. If I push the whole bow section off to the left/port, it corrects the "shift", but the bow goes out of plumb and the sheer goes out of level. Vexing would be a good word to describe.....

(see the slightly darker shaded area on the right of the picture)

Wednesday, December 2, 2009

Final ties, bottom to sides...


My hands are pretty worked, but the bottom and sides meet fairly consistently along the entire chine. There are 2 spots where there is a bit of a deviation, but these correspond to the braces from the frame that the boat is sitting on. I believe they should straighten out just fine. Now I am in a holding pattern until more $$$$ arrive to buy the BIG load of epoxy.

Sunday, November 29, 2009

Christmas lights and boat shapes......


So while I spent the weekend doing this......(built a frame on which to build the boat, cut out the last few larger pieces, stuck everything in place and began tieing together)


My wife and kids spent the weekend doing this:


(cleaning the kids bedrooms, getting down Christmas lights and decorating the entire house). I am a lucky guy to be able to dedicate a solid chunk of time like that.
Also, big thanks to John P and Gordon D who lent a huge hand getting the bigger panels in place. I will spend the week tieing in the chine more accurately and starting on the bulkheads.

Saturday, November 28, 2009

the missing link.....


.........somewhere between plywood and a boat like thing.........i550 in it's earliest stages of evolution. There is some extra material on the side panels that extends past the transom. In order to race PHRF, the boat needs to be 19', so I am building a bolt on sugar scoop off the back.

Wednesday, November 25, 2009

Butt Joints and BEER!


I LOVE the smell of chemicals reacting!! Just knocked out the butt joints on the 3 long panels (bottom and 2 sides). A butt joint is quite simple: you butt 2 pieces of ply together, and let the toxic epoxy stew do the rest. Just pray I didn't glue anything together that shouldn't be.


I have also started the BEER-O-METER........we'll soon know how many beers it takes to build an i550. The counter is on the right side of the page.

Monday, November 23, 2009

It fits!


As many times as I measured and calculated etc, it wasn't until I saw the bottom panel laid out on the floor that I believed this thing was going to fit in the garage. I've got room to spare! Notice the warp, lower left.....annoying, but ultimately inconsequential......at least that's my story (for now) and I'm stickin' to it!

Sunday, November 22, 2009

Marking and cutting


I feel pretty good about choosing the Tyvec patterns. I really didn't want to takethe time to loft from plans, but a full kit seemed like a bigger investment than I needed This has proven to be a great option.

warpage.....


I know that thin ply has a bit of a warp to it, just not sure how much this may affect the hull's final shape. This is the same stack, whooped up, then whooped down.....

It's ON like DONKEY KONG!!!!


I have started for REAL! 20 sheets of (slightly warped) Meranti Hydrotech 1/4" Mahoganey marine ply are stacked in the garage. All of the major parts have been marked, and I am in the process of cutting out those pieces. One tip: use a paint that will provide good contrast. I was tickled to find a happy shade of yellow in the paint section of my garage. Unfortunately, it is close enough to the color of the wood that is a bit tough to see the line sometimes. Live and learn. So far, this has gone smoothly.

Sunday, October 11, 2009

The TOOL......


Not sure why, but it seems worth noting that one of the best things I have going for me is a hand-me-down Shop Smith from George Magan (Stairbuilder) that has been and will be the back bone of this process. Here it is in its disc sander configuration. It is also a table saw, lathe, drill press, joiner etc.

redemtion


If you get the big sheets of foam you have plenty of material to practice with and you may finally end up with something that looks like this. It also means it looked like it snowed INSIDE your garage.

that was fast......revisited!


So I am learning to blog AND build a boat. Here is the picture of that first skrew up mentioned below.

Monday, October 5, 2009

Why it is at all possible........


As I was flipping through the garage photos I came across this particularly lovely shot of my wife, Molly. I couldn't help but post it as I MUST give her a HUGE amount of credit for putting up with me and my hair-brained ideas over the years. You know, things like, "Honey, I want to build a sailboat in the garage!"
In the almighty words of Ricky Bobby, "I thank the sweet baby Lord Jesus for my SMOKIN' HOT WIFE!!".

Start to Finish.........


I wanted to document this process from start to finish. It was only fitting that you see where it all began: in the garage, full of all the stuff that a guy in his 40's (and family) collects. Notice the multi-functional clothes hanging storeage rack in the middle of the picture that doubles as a fitness machine. The greatest joy of this build so far has been cleaning out the garage!

Sunday, October 4, 2009

that was fast!

It didn't take long for my first "cock-up" as the ausies would say. I am cutting the foam for the mold of the bulb (at the bottom of the keel....this will all make more sense soon) and trying to glue the cross sections together. Seems simple enough, no? Unfortunately, the foam doesn't like the contact cement.....see picture. Glad I tried a "sample" first!

Getting started.........

The idea is to build an i550, a very sexy little 18' sailboat. I will post some links to the blogs of the brave people who have started this process before me. Their work is impresive. It will also give you an idea of where I am hopefully headed.
But first, an explanation of the name: you see, my boys and I (JP, 5 yrs and Mickey, 7 yrs old) have a hard time talking about boogers with out laughing at least a little. This process can be a bit intimidating and I wanted to remind myself at each turn that it is supposed to be fun. It is also a process that is bound to get messy at some point. And I am hoping that the finished product is, "SLICKER THAN SNAIL SH___". Finally, it helps solve one of the million little decisions I need to make along the way, that is, what color to paint the boat when I'm done.