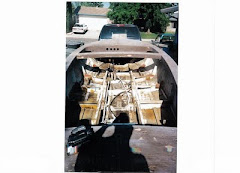
First, after going around in my head about how to approach the cockpit, and then a fruitful e-mail exchange w/ Jerome Negre, I have decided that this is the way I am going to proceed with the cockpit: 1) cover all frames and the outboard rail w/ plastic 2) temporarily screw ddeck pieces in place 3) zip tie foam 4) fit sides 5) tab those from below 6) fit cockpit sole 7) shape foam 8) glass all from above 9) pull out monocoque cockpit/flip/tape seams 10) replace it and tape what I can reach. There will only be a few spots that will be unaccessible, and this will create a bomber cockpit.
The option was to work from the outboard in, shaping/placing/taping each piece in as I went. I can't see how I am going to get the sole in the way I want it if I go that route.
But I am not too far into this process to change my mind again so ANY ADVICE will be welcomed!
I should have all that knocked out in a night or two.....
Second, I cut out the companionway. I am happy with what I ended up with...so far.
I went 20 inches wide and 18 inches back from the trailing edge of the rooftop. I then cut down to 4 inches above the cockpit sole, and tapered it in to about 15 inches wide. 


I have found that a sawsall is surprisingly handy at times.....in this case, cutting the corners from the cabin top to the aft face of the cabin.
Finally, I quickly ran through the blogs of Pipedream, Alchemy, and Clownfish and found that if you timeline their builds, working out the cockpit marked their half way point (approximately). If that is the case, I need some of those 220 V tools they use in Australia to accelerate my build or I am going to miss the season altogether!!


Looking great Ben. Option B for your cockpit area might be to find a tiny wife or mistress to glue/glass from inside--no I'm not lending you mine. Oh, it's 240 volt not 220--no wonder we're so fast or is that fat?
ReplyDeletelooks good Ben.
ReplyDelete